Instrument Care
Important
Your instrument is a class two medical device. This page provides instructions for instrument care and is NOT intended to be a diagnostic or technical service resource.
For SAFETY reasons, you should not attempt to open or expose an instruments internal components or electronics. Such attempts will void the warranty.
Instrument care should be performed in accordance with recomendations in a dry environment with the instrument detatched from any power source.
If you suspect your instrument is not performing correctly, discontinue use and contact a Practice Advisor.
480-785-8448
Between patients
In between patients, the silicone tip of the instrument stylus should be inspected for wear and wiped down with a sanitary disinfectant such as Isopropyl Alcohol 70% or similar substance appropriate for external use on humans.
Cleaning the exterior housing and grip
Cleaning is the only maintenance recommended to be performed by owner. Cleaning the device can be accomplished by wiping with a dry cloth.
Changing (alternating) stylus tips
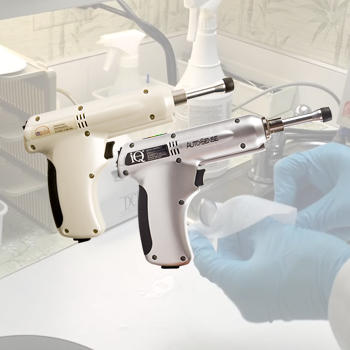
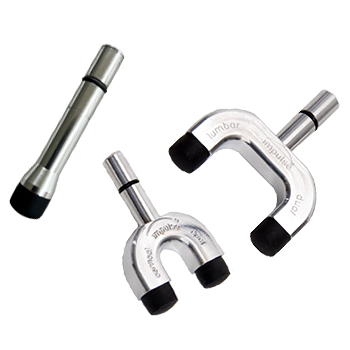
The Impulse and Impulse iQ Adjusting Instrument® come standard equipped with interchangeable single stylus and cervical and lumbar dual styluses. The styluses are held in place by a small black o-ring found on the shaft of the stylus. To remove a stylus, simply grasp the instrument housing firmly and pull the stylus out of its compression fitting – there will be an audible pop, but, don’t worry – it’s perfectly normal.
Stylus o-ring lubrication
- Remove the Cap
Carefully take off the plastic top from the oiler. The cap is cone-shaped and black in color. - Position the Oiler
Hold the oiler at approximately a 45-degree angle to the surface of the o-ring you wish to lubricate. - Dispense Lubricant
Observe the tip of the oiler:
- If no lubricant appears, gently squeeze the oiler.
- A small droplet of oil should begin to form at the tip.
- Apply to O-ring
Lightly touch the droplet to the o-ring and move the oiler around the surface to distribute the lubricant. - Even Out Lubrication (Optional)
Take a separate stylus and gently press its o-ring against the lubricated o-ring.
Move it in a circular motion to help distribute the lubricant evenly.
⚠️ Be careful not to touch the metal parts of the stylus together, as this may cause excess grease to transfer onto surfaces where it’s not wanted.
Stylus O-Ring Replacement
O-Ring Replacement (Watch Video Above)
In this video, we’ll show you how to remove and replace the O-ring.
Start by locating the O-ring seated in the grooves of the stylus. Using a small screwdriver or similar tool, gently lift and roll the O-ring out of the slots. Take care not to damage the surrounding components.
Once removed, discard the old O-ring. Take the new O-ring and carefully stretch it over the tip, guiding it into the designated grooves. Make sure it is evenly seated and fully secured in place.
With the new O-ring installed, you’re ready to reassemble the stylus and return the instrument to use.
Stylus tip Replacement
Stylus Tip Replacement. (Watch Video Above)
In this video, we’ll show you how to remove and replace the stylus tip.
Removing the tip can be a little difficult. The best way to do this is with a small screwdriver. Gently pry underneath the tip until you get a good grip, then slide upward and over to remove the O-ring from the slots.
Once the old tip is removed, discard it. Take the new tip, position it over the stylus, and slide it into place. It will pop in securely.
You’re now ready to reinsert the stylus into the instrument and begin using it.
Reach Us
World Headquarters
783 County Route 3
Fulton, NY 13069
Sales & Service
9831 S. 51st St., Suite D-131
Phoenix • AZ • 85044
480.785.8448
888.294.4750
Repair & Service Issues: Please click HERE for the return and repair portal.